内容简介:研究了一段时间的蓝牙使用,发现网上相关的资料比较贫乏,不像其他Android相关资料那么齐全,基本上大部分资料都是在蓝牙联盟SIG提供的官网Android BLE基础操作框架,基于回调,操作简单。其中包含扫描、连接、广播包解析、服务读写及通知等功能。扫描包含三种方式,第一种方式是直接扫描所有设备,可以设置循环扫描,也可以设置超时时间,扫描到的设备可以添加到
前言
研究了一段时间的蓝牙使用,发现网上相关的资料比较贫乏,不像其他Android相关资料那么齐全,基本上大部分资料都是在蓝牙联盟SIG提供的官网 https://www.bluetooth.com/zh-cn/specifications 上查找得到,也没有一个比较稳定好用的基础操作框架,开发时遇到的各种问题也是非常头疼。在此种情况下该框架应运而生,框架中包含了蓝牙设备的基础操作功能,调用简单,已通过实际项目进行验证,并且配有一个比较好用的demo演示,下文主要讲述该框架的使用方式。如果对于Android BLE还不是很了解,可以先看看我的这篇博文 Android BLE学习笔记 ,里面对于蓝牙的基础知识有详细的讲述。
Android BLE基础操作框架,基于回调,操作简单。其中包含扫描、连接、广播包解析、服务读写及通知等功能。
- 项目地址: https://github.com/xiaoyaoyou1212/BLE
-
项目引入:
compile 'com.vise.xiaoyaoyou:baseble:1.0.5'
设备扫描
使用简介
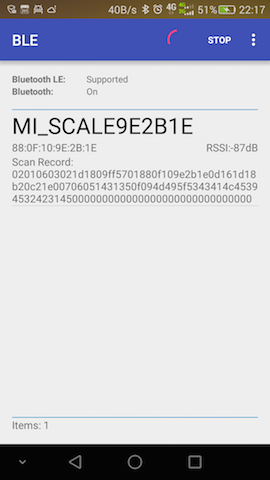
扫描包含三种方式,第一种方式是直接扫描所有设备,可以设置循环扫描,也可以设置超时时间,扫描到的设备可以添加到 BluetoothLeDeviceStore
中统一进行处理,使用方式如下:
ViseBluetooth.getInstance().setScanTimeout(-1).startScan(new PeriodScanCallback() {
    @Override
    public void scanTimeout() {

    }

    @Override
    public void onDeviceFound(BluetoothLeDevice bluetoothLeDevice) {
        bluetoothLeDeviceStore.addDevice(bluetoothLeDevice);
    }
});
第二种方式是扫描指定Mac地址的设备,一般需设置超时时间,扫描到指定设备后就停止扫描,使用方式如下:
ViseBluetooth.getInstance().setScanTimeout(5000).startScan(new PeriodMacScanCallback() {
    @Override
    public void scanTimeout() {

    }

    @Override
    public void onDeviceFound(BluetoothLeDevice bluetoothLeDevice) {

    }
});
第三种方式是扫描指定广播名的设备,同第二种方式类似,也需设置超时时间,扫描到指定设备后也会停止扫描,使用方式如下:
ViseBluetooth.getInstance().setScanTimeout(5000).startScan(new PeriodNameScanCallback() {
    @Override
    public void scanTimeout() {

    }

    @Override
    public void onDeviceFound(BluetoothLeDevice bluetoothLeDevice) {

    }
});
其中扫描到的设备信息都统一放到 BluetoothLeDevice
中,其中包含了设备的所有信息,以下会详细讲解具体包含哪些信息。
设备连接
使用简介
连接与扫描一样也有三种方式,第一种方式是在扫描获取设备信息 BluetoothLeDevice
后才可使用,可设置连接超时时间,默认超时时间为10秒,使用方式如下:
ViseBluetooth.getInstance().connect(bluetoothLeDevice, false, new IConnectCallback() {
    @Override
    public void onConnectSuccess(BluetoothGatt gatt, int status) {

    }

    @Override
    public void onConnectFailure(BleException exception) {

    }

    @Override
    public void onDisconnect() {

    }
});
第二种方式是连接指定Mac地址的设备,该方式使用前不需要进行扫描,该方式直接将扫描和连接放到一起,在扫描到指定设备后自动进行连接,使用方式如下:
ViseBluetooth.getInstance().connectByMac(mac, false, new IConnectCallback() {
    @Override
    public void onConnectSuccess(BluetoothGatt gatt, int status) {

    }

    @Override
    public void onConnectFailure(BleException exception) {

    }

    @Override
    public void onDisconnect() {

    }
});
第三种方式是连接指定名称的设备,该方式与第二种方式类似,使用方式如下:
ViseBluetooth.getInstance().connectByName(name, false, new IConnectCallback() {
    @Override
    public void onConnectSuccess(BluetoothGatt gatt, int status) {

    }

    @Override
    public void onConnectFailure(BleException exception) {

    }

    @Override
    public void onDisconnect() {

    }
});
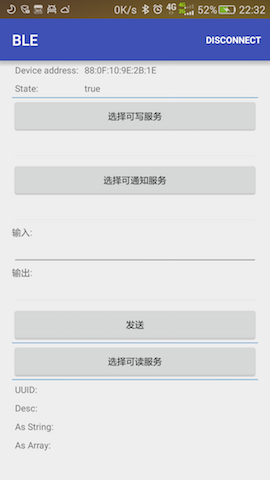
连接成功后就可以进行相关处理,回调已在底层做了线程切换处理,可以直接操作视图。如果知道该设备服务的UUID,可直接调用 ViseBluetooth.getInstance().withUUIDString(serviceUUID, characteristicUUID, descriptorUUID);
,那么在下面操作设备时就不需要传特征( BluetoothGattCharacteristic
)和描述( BluetoothGattDescriptor
)相关参数,如果在连接成功后一直没设置UUID,那么在操作时则需要传该参数,该内容在下文的设备操作中会详细讲解,此处就不一一讲解了。
设备详情
使用简介
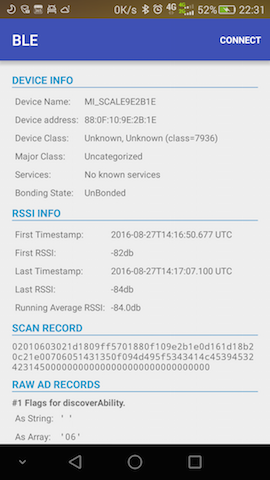
DEVICE INFO(设备信息)
bluetoothLeDevice.getName()
bluetoothLeDevice.getAddress()
bluetoothLeDevice.getBluetoothDeviceClassName()
bluetoothLeDevice.getBluetoothDeviceMajorClassName()
bluetoothLeDevice.getBluetoothDeviceKnownSupportedServices()
bluetoothLeDevice.getBluetoothDeviceBondState()
RSSI INFO(信号信息)
bluetoothLeDevice.getFirstTimestamp()
bluetoothLeDevice.getFirstRssi()
bluetoothLeDevice.getTimestamp()
bluetoothLeDevice.getRssi()
bluetoothLeDevice.getRunningAverageRssi()
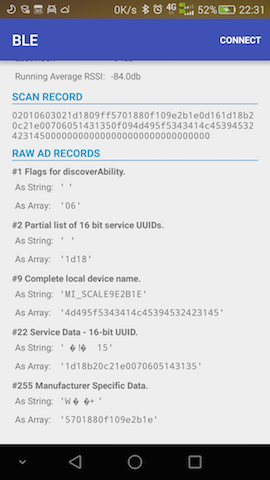
SCAN RECORD INFO(广播信息)
根据扫描到的广播包 AdRecordStore
获取某个广播数据单元 AdRecord
的类型编号 record.getType()
,再根据编号获取广播数据单元的类型描述 record.getHumanReadableType()
以及该广播数据单元的长度及数据内容,最后通过 AdRecordUtil.getRecordDataAsString(record)
将数据内容转换成具体字符串。
设备操作
使用简介
在操作设备前首先要保证设备已连接成功,那么在设备连接成功获取到 BluetoothGatt
后直接对服务的特征值UUID进行相关处理,其中特征值UUID有可读、可写、可通知、指示器四种,获取过程如下所示:
final String unknownServiceString = getResources().getString(R.string.unknown_service);
final String unknownCharaString = getResources().getString(R.string.unknown_characteristic);
final List<Map<String, String>> gattServiceData = new ArrayList<>();
final List<List<Map<String, String>>> gattCharacteristicData = new ArrayList<>();
mGattCharacteristics = new ArrayList<>();

// Loops through available GATT Services.
for (final BluetoothGattService gattService : gattServices) {
    final Map<String, String> currentServiceData = new HashMap<>();
    uuid = gattService.getUuid().toString();
    currentServiceData.put(LIST_NAME, GattAttributeResolver.getAttributeName(uuid, unknownServiceString));
    currentServiceData.put(LIST_UUID, uuid);
    gattServiceData.add(currentServiceData);

    final List<Map<String, String>> gattCharacteristicGroupData = new ArrayList<>();
    final List<BluetoothGattCharacteristic> gattCharacteristics = gattService.getCharacteristics();
    final List<BluetoothGattCharacteristic> charas = new ArrayList<>();

    // Loops through available Characteristics.
    for (final BluetoothGattCharacteristic gattCharacteristic : gattCharacteristics) {
        charas.add(gattCharacteristic);
        final Map<String, String> currentCharaData = new HashMap<>();
        uuid = gattCharacteristic.getUuid().toString();
        currentCharaData.put(LIST_NAME, GattAttributeResolver.getAttributeName(uuid, unknownCharaString));
        currentCharaData.put(LIST_UUID, uuid);
        gattCharacteristicGroupData.add(currentCharaData);
    }

    mGattCharacteristics.add(charas);
    gattCharacteristicData.add(gattCharacteristicGroupData);
}
在获取到 BluetoothGattCharacteristic
后可进行如下操作:
- 设置通知服务
ViseBluetooth.getInstance().enableCharacteristicNotification(characteristic, new IBleCallback<BluetoothGattCharacteristic>() {
    @Override
    public void onSuccess(BluetoothGattCharacteristic bluetoothGattCharacteristic, int type) {

    }

    @Override
    public void onFailure(BleException exception) {

    }
}, false);
其中最后一个参数是设置该通知是否是指示器方式,指示器方式为有应答的通知方式,在传输时更为靠谱。如果在连接成功时已经知道该设备可通知的UUID并且已经设置成功,那么此处还可以如下设置:
ViseBluetooth.getInstance().enableCharacteristicNotification(new IBleCallback<BluetoothGattCharacteristic>() {
    @Override
    public void onSuccess(BluetoothGattCharacteristic bluetoothGattCharacteristic, int type) {

    }

    @Override
    public void onFailure(BleException exception) {

    }
}, false);
- 读取信息
ViseBluetooth.getInstance().readCharacteristic(characteristic, new IBleCallback<BluetoothGattCharacteristic>() {
    @Override
    public void onSuccess(BluetoothGattCharacteristic bluetoothGattCharacteristic, int type) {

    }

    @Override
    public void onFailure(BleException exception) {

    }
});
同上,如果已设置过可读的UUID,那么此处也可以通过如下方式读取信息:
ViseBluetooth.getInstance().readCharacteristic(new IBleCallback<BluetoothGattCharacteristic>() {
    @Override
    public void onSuccess(BluetoothGattCharacteristic bluetoothGattCharacteristic, int type) {

    }

    @Override
    public void onFailure(BleException exception) {

    }
});
- 写入数据
ViseBluetooth.getInstance().writeCharacteristic(characteristic, new byte[]{0x00,0x01,0x02}, new IBleCallback<BluetoothGattCharacteristic>() {
    @Override
    public void onSuccess(BluetoothGattCharacteristic bluetoothGattCharacteristic, int type) {

    }

    @Override
    public void onFailure(BleException exception) {

    }
});
同样,如果在连接成功时设置过可写UUID,那么此处也可以通过如下方式写入数据:
ViseBluetooth.getInstance().writeCharacteristic(new byte[]{0x00,0x01,0x02}, new IBleCallback<BluetoothGattCharacteristic>() {
    @Override
    public void onSuccess(BluetoothGattCharacteristic bluetoothGattCharacteristic, int type) {

    }

    @Override
    public void onFailure(BleException exception) {

    }
});
此处的数据 new byte[]{0x00,0x01,0x02}
为模拟数据,在使用时替换为真实数据即可,切记每次发送的数据必须在20个字节内,如果大于20字节可采用分包机制进行处理。
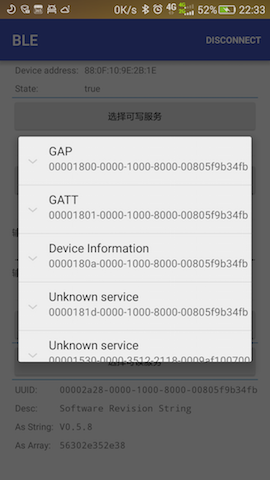
从以上的描述中可以知道,设备相关的所有操作都统一交给 ViseBluetooth
进行处理,并且该类是单例模式,全局只有一个,管理很方便。使用前必须要在Application中调用 ViseBluetooth.getInstance().init(this);
进行初始化,在连接设备成功时会自动获得一个 BluetoothGatt
,在断开连接时会将该 BluetoothGatt
关闭,上层不用关心连接数最大为6的限制问题,只需要在需要释放资源时调用 ViseBluetooth.getInstance().clear();
就行,简单易用,这也正是该项目的宗旨。
在此要感谢两位作者提供的开源库 https://github.com/litesuits/android-lite-bluetoothLE 和 https://github.com/alt236/Bluetooth-LE-Library—Android ,这两个开源库对于本项目的完成提供了很大的帮助。
以上就是本文的全部内容,希望本文的内容对大家的学习或者工作能带来一定的帮助,也希望大家多多支持 码农网
猜你喜欢:- SQLAlchemy框架用法详解
- OSGi模块化框架详解
- Android组件化框架项目详解
- Hadoop 框架:DataNode 工作机制详解
- Lararel 框架执行流程详解(1) 入口文件
- 模仿hibernate框架,详解hibernate部分方法设计
本站部分资源来源于网络,本站转载出于传递更多信息之目的,版权归原作者或者来源机构所有,如转载稿涉及版权问题,请联系我们。


