iOS Objective-C与Swift开发过程的详细比较
栏目: Objective-C · 发布时间: 7年前
内容简介:版权声明:本文为博主原创文章,未经博主允许不得转载。 https://blog.csdn.net/fenghuangjc/article/details/82817832
版权声明:本文为博主原创文章,未经博主允许不得转载。 https://blog.csdn.net/fenghuangjc/article/details/82817832
前段时间,本人同时开发了两个项目,一个用的OC,一个用的Swift。在使用中对两种语言进行一次梳理与比较。
基础文件
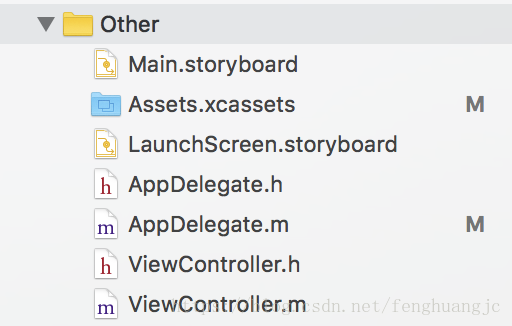
OC
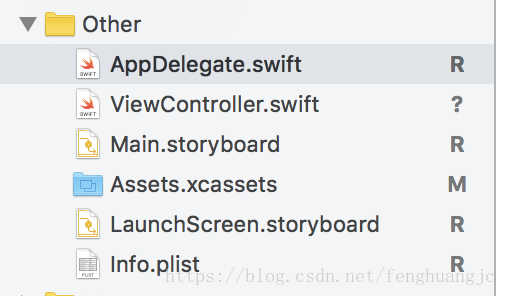
Swift
OC程序里,一个类会有两个文件,.h和.m。.h可以写属性、方法声明等,.m可以写方法的具体实现。
Swift的类只有一个文件,就是.swift方法声明和实现是一起的
AppDelegate
OC
<code>- (BOOL)application:(UIApplication *)application didFinishLaunchingWithOptions:(NSDictionary *)launchOptions {
	self.window = [[UIWindow alloc]initWithFrame:[UIScreen mainScreen].bounds];
    self.window.rootViewController = [[JCTabBarController alloc]init];
    [self.window makeKeyAndVisible];
。
。
。
return YES;
}
</code>
Swift
func application(_ application: UIApplication, didFinishLaunchingWithOptions launchOptions: [UIApplicationLaunchOptionsKey: Any]?) -> Bool {
		window = UIWindow.init(frame: UIScreen.main.bounds)
        window?.rootViewController = JCTabBarController()
        window?.makeKeyAndVisible()
        。
        。
        。
    }
TabBarController
OC
<code>- (void)viewDidLoad {
    [super viewDidLoad];
    self.delegate = self;
    UITabBar *tabbar = [UITabBar appearance];
    tabbar.tintColor = kTextColor;
    [tabbar setBackgroundColor:kRGBColor(210, 218, 218)];
    tabbar.translucent = NO;
    [self addChildViewControllers];
    [JCTool getInstance].tabbatController = self;
}

- (void)addChildViewControllers
{
    [self addChildViewController:[HomeViewController new] title:@"首页" imageName:@"TabBar_home_23x23_" selectImageName:@"TabBar_home_23x23_selected"];
    [self addChildViewController:[LotteryViewController new] title:@"幸运" imageName:@"TabBar_win_23x23_" selectImageName:@"TabBar_win_23x23_selected"];
    [self addChildViewController:[MoneyViewController new] title:@"资金明细" imageName:@"TabBar_money_23x23_" selectImageName:@"TabBar_money_23x23_selected"];
    [self addChildViewController:[MyViewController new] title:@"我的" imageName:@"TabBar_my_23x23_" selectImageName:@"TabBar_my_23x23_selected"];
}

- (void)addChildViewController:(UIViewController *)childController title:(NSString *)title imageName:(NSString *)imageString selectImageName:(NSString *)selectImageName{
    childController.tabBarItem.image = [UIImage imageNamed:imageString];
    childController.tabBarItem.selectedImage = [[UIImage imageNamed:selectImageName] imageWithRenderingMode:UIImageRenderingModeAlwaysOriginal];
    childController.title = title;
    JCNavigationController *nav = [[JCNavigationController alloc]init];
    nav.title = title;
    [nav addChildViewController:childController];
    [self addChildViewController:nav];
}
</code>
Swift
override func viewDidLoad() {
        super.viewDidLoad()
        self.delegate = self
        let tabbar = UITabBar.appearance()
        tabbar.tintColor = kMainColor
        tabbar.isTranslucent = true;
        addChildViewControllers()
    }

    func addChildViewControllers() -> Void {
        addChildViewController(childController: HomeViewController(), title: "首页", imageName: "home", selectImageName: "home_select")
        addChildViewController(childController: MoneyViewController(), title: "充值", imageName: "money", selectImageName: "money_select")
        addChildViewController(childController: NotifactionViewController(), title: "动态", imageName: "notification", selectImageName: "notification_select")
        addChildViewController(childController: MyViewController(), title: "我的", imageName: "my", selectImageName: "my_select")
    }

    func addChildViewController(childController:UIViewController,title:String,imageName:String,selectImageName:String) -> Void {
        childController.tabBarItem.image = UIImage.init(named: imageName)
        childController.tabBarItem.selectedImage = UIImage.init(named: selectImageName)
        childController.title = title;
        let navC = JCNavigationController.init(rootViewController: childController)
        navC.title = title;
        addChildViewController(navC)
    }
TableView代理方法
OC
<code>@interface TableViewController ()<UITableViewDelegate,UITableViewDataSource>
@property(nonatomic,strong)UITableView *tableView;
@end

@implementation TableView
- (NSInteger)tableView:(UITableView *)tableView numberOfRowsInSection:(NSInteger)section{
    return self.modelArray.count;
}

- (UITableViewCell *)tableView:(UITableView *)tableView cellForRowAtIndexPath:(NSIndexPath *)indexPath{
    ClongCell *cell = [tableView dequeueReusableCellWithIdentifier:@"ClongCell" forIndexPath:indexPath];
    [cell setSelectionStyle:UITableViewCellSelectionStyleNone];
    ClongModel *model = self.modelArray[indexPath.row];
    cell.model = model;
    return cell;
}
-(void)tableView:(UITableView *)tableView didSelectRowAtIndexPath:(NSIndexPath *)indexPath{
    NSLog(@"点击了");
}
@end
</code>
Swift
import UIKit

class TableViewController: UIViewController {
    var modelArray: [HomeModel]
    override func viewDidLoad() {
        super.viewDidLoad()
    }
}

//代理方法
extension TableViewController:UITableViewDataSource,UITableViewDelegate {
    func tableView(_ tableView: UITableView, numberOfRowsInSection section: Int) -> Int {
        return modelArray.count;
    }

    func tableView(_ tableView: UITableView, cellForRowAt indexPath: IndexPath) -> UITableViewCell {
        let message = self.modelArray[indexPath.row];
        let cell = tableView.dequeueReusableCell(withIdentifier: "message", for: indexPath)
        cell.textLabel?.text = message.title
        cell.detailTextLabel?.text = message.content
        return cell
    }

    func tableView(tableView: UITableView, didSelectRowAtIndexPath indexPath: NSIndexPath) {
        print("点击了\(indexPath.row)")
    }
}
以上就是本文的全部内容,希望本文的内容对大家的学习或者工作能带来一定的帮助,也希望大家多多支持 码农网
猜你喜欢:
- 浅谈基于SQL Server分页存储过程五种方法及性能比较
- MySQL 使用自增ID主键和UUID 作为主键的优劣比较详细过程(从百万到千万表记录测试)
- React与Vue模板使用比较(一、vue模板与React JSX比较)
- 从全方位为你比较3种数据科学工具的比较:Python、R和SAS(附链接)
- F#序列比较
- (翻译)前端构建工具的比较
本站部分资源来源于网络,本站转载出于传递更多信息之目的,版权归原作者或者来源机构所有,如转载稿涉及版权问题,请联系我们。

Learning PHP, MySQL, and JavaScript
Robin Nixon / O'Reilly Media / 2009-7-21 / USD 39.99
Learn how to create responsive, data-driven websites with PHP, MySQL, and JavaScript - whether or not you know how to program. This simple, streamlined guide explains how the powerful combination of P......一起来看看 《Learning PHP, MySQL, and JavaScript》 这本书的介绍吧!


