内容简介:这篇文章主要介绍了Flex中TitleWindow传值思路及实现,需要的朋友可以参考下1、设计思路
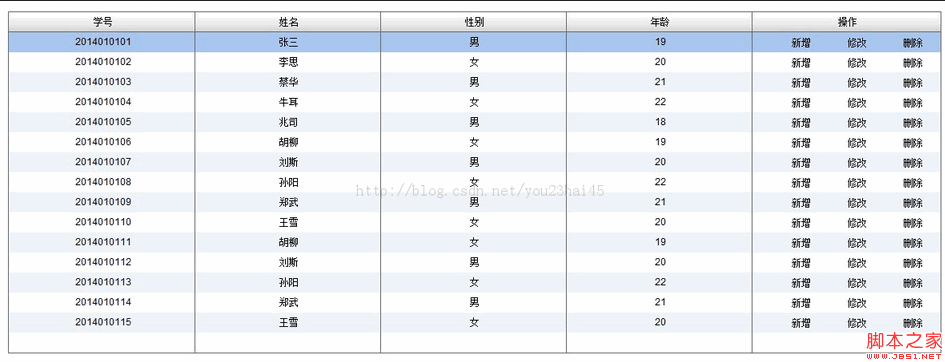
(1)新建一个DataGrid,在其中最后一列加入三个按钮:新增、修改和删除;
(2)点击新增按钮,可以将表格新增一行;
(3)单击“修改”按钮,可以修改表格中该行的一些属性;
(4)单击“删除”按钮,会将表格中该行删除。
2、实现步骤
(1)新建一个应用程序,DataGrid.mxml
DataGrid.mxml:
复制代码 代码如下:
<?xml version="1.0" encoding="utf-8"?>
<s:Application xmlns:fx="http://ns.adobe.com/mxml/2009"
xmlns:s="library://ns.adobe.com/flex/spark"
xmlns:mx="library://ns.adobe.com/flex/mx" minWidth="955" minHeight="600">
<s:layout>
<s:BasicLayout/>
</s:layout>
<fx:Declarations>
<!-- 将非可视元素(例如服务、值对象)放在此处 -->
</fx:Declarations>
<fx:Script>
<![CDATA[
import mx.collections.ArrayCollection;
[Bindable]
//表格数据源绑定
private var grid:ArrayCollection = new ArrayCollection([
{number:"2014010101",name:"张三",sex:"男",age:"19"},
{number:"2014010102",name:"李思",sex:"女",age:"20"},
{number:"2014010103",name:"蔡华",sex:"男",age:"21"},
{number:"2014010104",name:"牛耳",sex:"女",age:"22"},
{number:"2014010105",name:"兆司",sex:"男",age:"18"},
{number:"2014010106",name:"胡柳",sex:"女",age:"19"},
{number:"2014010107",name:"刘斯",sex:"男",age:"20"},
{number:"2014010108",name:"孙阳",sex:"女",age:"22"},
{number:"2014010109",name:"郑武",sex:"男",age:"21"},
{number:"2014010110",name:"王雪",sex:"女",age:"20"},
{number:"2014010111",name:"胡柳",sex:"女",age:"19"},
{number:"2014010112",name:"刘斯",sex:"男",age:"20"},
{number:"2014010113",name:"孙阳",sex:"女",age:"22"},
{number:"2014010114",name:"郑武",sex:"男",age:"21"},
{number:"2014010115",name:"王雪",sex:"女",age:"20"}
]);
]]>
</fx:Script>
<mx:VBox width="100%" height="100%" paddingBottom="100" paddingLeft="100" paddingRight="100" paddingTop="100">
<mx:DataGrid id="dataGrid" dataProvider="{grid}" rowCount="{grid.length+1}" width="100%" textAlign="center">
<mx:columns>
<mx:DataGridColumn headerText="学号" dataField="number" id="stuNumber"/>
<mx:DataGridColumn headerText="姓名" dataField="name"/>
<mx:DataGridColumn headerText="性别" dataField="sex"/>
<mx:DataGridColumn headerText="年龄" dataField="age"/>
<mx:DataGridColumn headerText="操作">
<mx:itemRenderer>
<fx:Component>
<mx:HBox width="100%" paddingLeft="40">
<fx:Script>
<![CDATA[
import mx.managers.PopUpManager;
/*添加按钮事件函数*/
protected function addHandler(event:MouseEvent):void
{
var childWindow:ChildWindow = ChildWindow(PopUpManager.createPopUp(this,ChildWindow,true));
var point:Point = new Point(100,100);
childWindow.x = point.x + 400;
childWindow.y = point.y + 50;
}
/*修改按钮事件函数*/
protected function updateHandler(event:MouseEvent):void
{
var updateWindow:UpdateWindow = UpdateWindow(PopUpManager.createPopUp(this,UpdateWindow,true));
var point:Point = new Point(100,100);
updateWindow.x = point.x + 400;
updateWindow.y = point.y + 50;
updateWindow.stuNo = event.currentTarget.selectedItem.content;
}
]]>
</fx:Script>
<mx:LinkButton label="新增" click="addHandler(event)"/>
<s:Label width="10"/>
<mx:LinkButton label="修改" click="updateHandler(event)"/>
<s:Label width="10"/>
<mx:LinkButton label="删除"/>
</mx:HBox>
</fx:Component>
</mx:itemRenderer>
</mx:DataGridColumn>
</mx:columns>
</mx:DataGrid>
</mx:VBox>
</s:Application>
(2)新建一个新增窗口组件,ChildWindow.mxml
ChildWindow.mxml:
复制代码 代码如下:
<?xml version="1.0" encoding="utf-8"?>
<s:TitleWindow xmlns:fx="http://ns.adobe.com/mxml/2009"
xmlns:s="library://ns.adobe.com/flex/spark"
xmlns:mx="library://ns.adobe.com/flex/mx" width="400" height="300"
close="closeHandler(event)" title="新增窗口">
<s:layout>
<s:BasicLayout/>
</s:layout>
<fx:Script>
<![CDATA[
import mx.events.CloseEvent;
import mx.managers.PopUpManager;
/*关闭按钮函数*/
protected function closeHandler(event:CloseEvent):void
{
PopUpManager.removePopUp(this);
}
/*取消按钮函数*/
protected function cancelHandler(event:MouseEvent):void
{
PopUpManager.removePopUp(this);
}
]]>
</fx:Script>
<fx:Declarations>
<!-- 将非可视元素(例如服务、值对象)放在此处 -->
</fx:Declarations>
<mx:VBox width="100%" height="100%" horizontalAlign="center">
<mx:Form borderStyle="solid" borderColor="#CCCCCC" width="100%">
<mx:FormHeading label="新增界面" fontSize="14"/>
<mx:FormItem label="学号:">
<s:TextInput id="stuNo" width="200"/>
</mx:FormItem>
<mx:FormItem label="姓名:">
<s:TextInput id="stuName" width="200"/>
</mx:FormItem>
<mx:FormItem label="性别:">
<s:TextInput id="stuSex" width="200"/>
</mx:FormItem>
<mx:FormItem label="年龄:">
<s:TextInput id="stuAge" width="200"/>
</mx:FormItem>
</mx:Form>
<mx:HBox width="100%" height="25">
<s:Label width="60"/>
<s:Button label="新增"/>
<s:Label width="48"/>
<s:Button label="取消" click="cancelHandler(event)"/>
</mx:HBox>
</mx:VBox>
</s:TitleWindow>
(3)新建一个修改界面组件,UpdateWindow.mxml
UpdateWindow.mxml:
复制代码 代码如下:
<?xml version="1.0" encoding="utf-8"?>
<s:TitleWindow xmlns:fx="http://ns.adobe.com/mxml/2009"
xmlns:s="library://ns.adobe.com/flex/spark"
xmlns:mx="library://ns.adobe.com/flex/mx" width="400" height="300"
close="closeHandler(event)" title="修改窗口">
<s:layout>
<s:BasicLayout/>
</s:layout>
<fx:Script>
<![CDATA[
import mx.events.CloseEvent;
import mx.managers.PopUpManager;
/*关闭按钮函数*/
protected function closeHandler(event:CloseEvent):void
{
PopUpManager.removePopUp(this);
}
/*取消按钮函数*/
protected function cancelHandler(event:MouseEvent):void
{
PopUpManager.removePopUp(this);
}
]]>
</fx:Script>
<fx:Declarations>
<!-- 将非可视元素(例如服务、值对象)放在此处 -->
</fx:Declarations>
<mx:VBox width="100%" height="100%" horizontalAlign="center">
<mx:Form borderStyle="solid" borderColor="#CCCCCC" width="100%">
<mx:FormHeading label="修改界面" fontSize="14"/>
<mx:FormItem label="学号:">
<s:TextInput id="stuNo" width="200"/>
</mx:FormItem>
<mx:FormItem label="姓名:">
<s:TextInput id="stuName" width="200"/>
</mx:FormItem>
<mx:FormItem label="性别:">
<s:TextInput id="stuSex" width="200"/>
</mx:FormItem>
<mx:FormItem label="年龄:">
<s:TextInput id="stuAge" width="200"/>
</mx:FormItem>
</mx:Form>
<mx:HBox width="100%" height="25">
<s:Label width="60"/>
<s:Button label="修改"/>
<s:Label width="48"/>
<s:Button label="取消" click="cancelHandler(event)"/>
</mx:HBox>
</mx:VBox>
</s:TitleWindow>
3、设计结果
(1)初始化时

以上就是本文的全部内容,希望本文的内容对大家的学习或者工作能带来一定的帮助,也希望大家多多支持 码农网
猜你喜欢:- javascript实现依赖注入的思路
- 几种延迟任务的实现思路
- 实现业务数据的同步迁移 · 思路一
- 从0到1实现VueUI库思路
- 仿金蝶,物料库存系统设计与实现思路
- Flex DataGrid 伪合并单元格实现思路
本站部分资源来源于网络,本站转载出于传递更多信息之目的,版权归原作者或者来源机构所有,如转载稿涉及版权问题,请联系我们。


