内容简介:没错,BeetlSQL又发版本了,感谢这么多用户提供建议和发现BUG,BeetlSQL成为2020年最积极运营的开源项目之一 :) BeetlSQL3 集成 ActFramework ,Act框架是一个非常强大的Web框架 修复了自从3.x以来可能导致内置S...
没错,BeetlSQL又发版本了,感谢这么多用户提供建议和发现BUG,BeetlSQL成为2020年最积极运营的开源项目之一 :)
- BeetlSQL3 集成 ActFramework ,Act框架是一个非常强大的Web框架
- 修复了自从3.x以来可能导致内置 SQL 找不到的BUG,建议升级
- 增强了Clickhouse集成,Clickhouse 不支持“主键”,BeetlSQL为CH提供自定义的MetaDataManager以支持@AssignId。
<dependency>
    <groupId>com.ibeetl</groupId>
    <artifactId>beetlsql</artifactId>
    <version>3.3.0-RELEASE</version>
</dependency>
BeetlSQL 的目标是提供开发高效,维护高效,运行高效的数据库访问框架,以我20年在电信,金融以及互联网天天CRUD的经验总结得来的框架,适用范围广。目前支持的数据库如下
- 传统数据库:MySQL,MariaDB,Oralce,Postgres,DB2,SQL Server,H2,SQLite,Derby,神通,达梦,华为高斯,人大金仓,PolarDB 等
- 大数据:HBase,ClickHouse,Cassandar,Hive
- 物联网时序数据库:Machbase,TD-Engine,IotDB
- SQL查询引擎:Drill,Presto,Druid
- 内存数据库:ignite,CouchBase
编译源码
git clone https://gitee.com/xiandafu/beetlsql
mvn clean package
mvn clean install #如果想修改源码
注意:BeetlSQL3 集成了Spring,以及支持大数据等,就算配置了国内镜像,也可能需要很长时间下载大数据依赖包,为了让编译快速通过,你需要进入pom.xml ,屏蔽sql-integration,sql-db-support,sql-jmh三个模块
<modules>
<!--核心功能 -->
<module>sql-core</module>
<module>sql-mapper</module>
<module>sql-util</module>
<module>sql-fetech</module>
<!-- 打包到一起 -->
<module>beetlsql</module>
<module>sql-gen</module>
<module>sql-test</module>
<module>sql-samples</module>
<!-- 集成和扩展太多的数据库,可以被屏蔽,以加速项目下载jar -->
<!--		<module>sql-integration</module>-->
<!--    <module>sql-jmh</module>-->
<!--		<module>sql-db-support</module>-->
</modules>
阅读源码例子
可以从模块sql-samples中找得到所有例子,或者从sql-test 中运行单元测试例子,或者在sql-integration 中的各个框架单元测试中找到相关例子。所有例子都是基于H2内存数据库,可以反复运行
以sql-samples为例子
sql-samples 又包含了三个模块大约100个例子
- quickstart: BeetlSQL基础使用例子,可以快速了解BeetlSQL3
- usuage: BeetlSQL所有API和功能
- plugin:BeetlSQL高级扩展实例
以usuage模块为例子,包含如下代码
- S01MapperSelectSample 15个例子, mapper中的查询演示
- S02MapperUpdateSample 11个例子, mapper中更新操作
- S03MapperPageSample 3个例子,mapper中的翻页查询
- S04QuerySample 9个例子,Query查询
- S05QueryUpdateSample 3个例子,Query完成update操作
- S06SelectSample 14个例子,SQLManager 查询API
- S07InsertSample 8个例子,SQLManager 插入新数据API,主键生成
- S08UpdateSample 6个例子,更新数据
- S09JsonMappingSample 5个例子, json配置映射
- S10FetchSample 2个例子,关系映射
- S11BeetlFunctionSample 2个例子,自定义sql脚本的方法
代码示例
例子1,内置方法,无需写SQL完成常用操作
UserEntity user  = sqlManager.unique(UserEntity.class,1);

user.setName("ok123");
sqlManager.updateById(user);

UserEntity newUser = new UserEntity();
newUser.setName("newUser");
newUser.setDepartmentId(1);
sqlManager.insert(newUser);
输出日志友好,可反向定位到调用的代码
┏━━━━━ Debug [user.selectUserAndDepartment] ━━━
┣ SQL:     select * from user where 1 = 1 and id=?
┣ 参数:     [1]
┣ 位置:     org.beetl.sql.test.QuickTest.main(QuickTest.java:47)
┣ 时间:     23ms
┣ 结果:     [1]
┗━━━━━ Debug [user.selectUserAndDepartment] ━━━
例子2 使用SQL
String sql = "select * from user where id=?";
Integer id  = 1;
SQLReady sqlReady = new SQLReady(sql,new Object[id]);
List<UserEntity> userEntities = sqlManager.execute(sqlReady,UserEntity.class);
//Map 也可以作为输入输出参数
List<Map> listMap =  sqlManager.execute(sqlReady,Map.class);
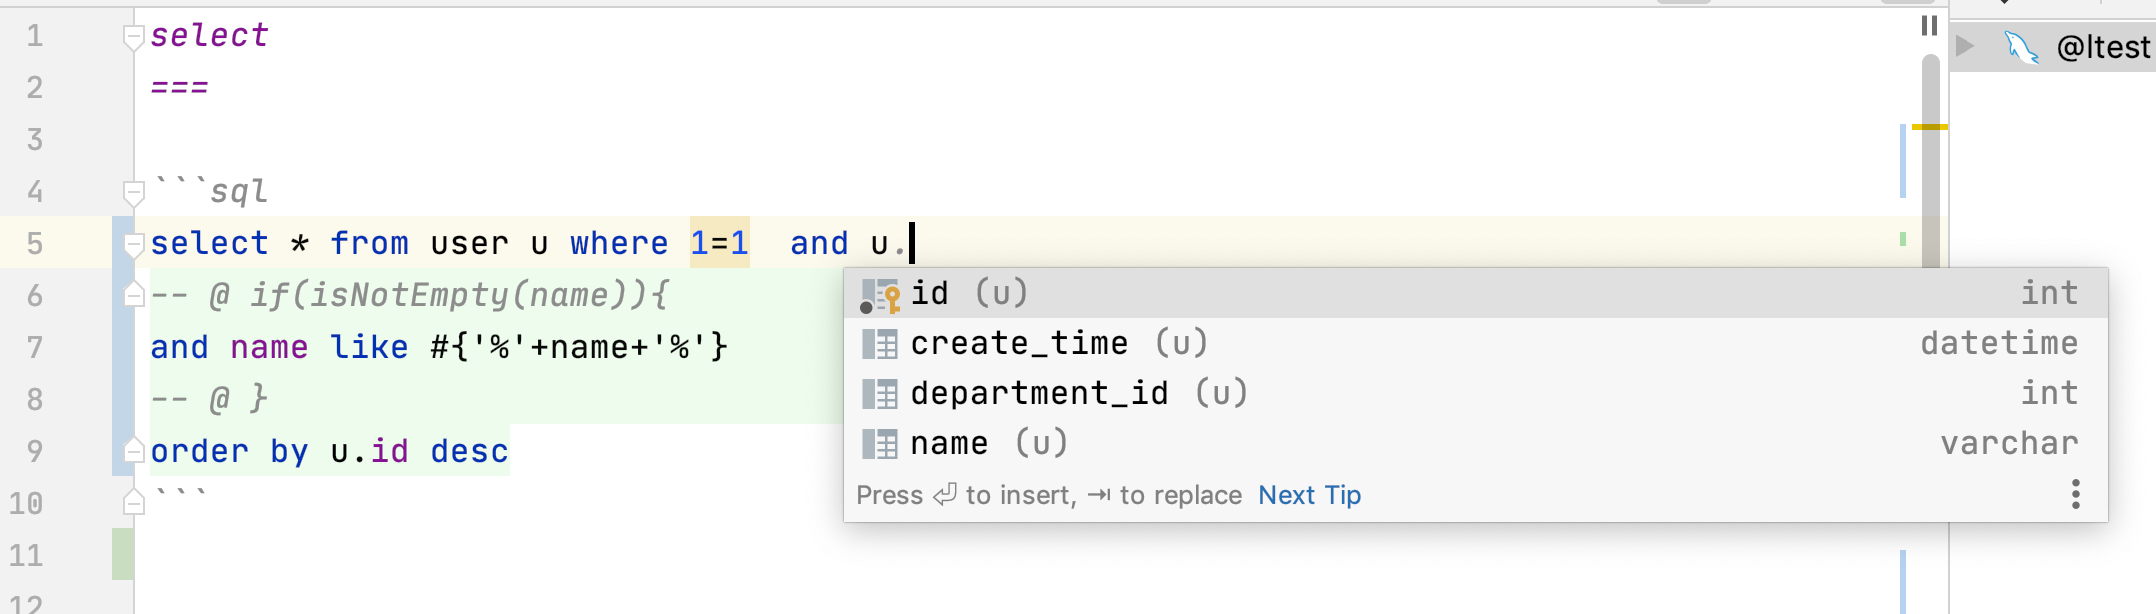
例子3 使用模板SQL
String sql = "select * from user where department_id=#{id} and name=#{name}";
UserEntity paras = new UserEntity();
paras.setDepartmentId(1);
paras.setName("lijz");
List<UserEntity> list = sqlManager.execute(sql,UserEntity.class,paras);

String sql = "select * from user where id in ( #{join(ids)} )";
List list = Arrays.asList(1,2,3,4,5); Map paras = new HashMap();
paras.put("ids", list);
List<UserEntity> users = sqlManager.execute(sql, UserEntity.class, paras);
例子4 使用Query类
支持重构
LambdaQuery<UserEntity> query = sqlManager.lambdaQuery(UserEntity.class);
List<UserEntity> entities = query.andEq(UserEntity::getDepartmentId,1)
                    .andIsNotNull(UserEntity::getName).select();
例子5 把数十行SQL放到sql文件里维护
//访问user.md#select
SqlId id = SqlId.of("user","select");
Map map = new HashMap();
map.put("name","n");
List<UserEntity> list = sqlManager.select(id,UserEntity.class,map);
例子6 复杂映射支持
支持像mybatis那样复杂的映射
- 自动映射
@Data
@ResultProvider(AutoJsonMapper.class)
 public static class MyUserView {
        Integer id;
        String name;
        DepartmentEntity dept;
 }
- 配置映射,比MyBatis更容易理解,报错信息更详细
{
	"id": "id",
	"name": "name",
	"dept": {
		"id": "dept_id",
		"name": "dept_name"
	},
	"roles": {
		"id": "r_id",
		"name": "r_name"
	}
}
例子7 最好使用mapper来作为数据库访问类
@SqlResource("user") /*sql文件在user.md里*/
public interface UserMapper extends BaseMapper<UserEntity> {

    @Sql("select * from user where id = ?")
    UserEntity queryUserById(Integer id);

    @Sql("update user set name=? where id = ?")
    @Update
    int updateName(String name,Integer id);

    @Template("select * from user where id = #{id}")
    UserEntity getUserById(Integer id);

    @SpringData/*Spring Data风格*/
    List<UserEntity> queryByNameOrderById(String name);

    /**
     * 可以定义一个default接口
     * @return
     */
     default  List<DepartmentEntity> findAllDepartment(){
        Map paras = new HashMap();
        paras.put("exlcudeId",1);
        List<DepartmentEntity> list = getSQLManager().execute("select * from department where id != #{exlcudeId}",DepartmentEntity.class,paras);
        return list;
    }


    /**
     * 调用sql文件user.md#select,方法名即markdown片段名字
     * @param name
     * @return
     */
     List<UserEntity> select(String name);


    /**
     * 翻页查询,调用user.md#pageQuery
     * @param deptId
     * @param pageRequest
     * @return
     */
    PageResult<UserEntity>  pageQuery(Integer deptId, PageRequest pageRequest);

    @SqlProvider(provider= S01MapperSelectSample.SelectUserProvider.class)
    List<UserEntity> queryUserByCondition(String name);

    @SqlTemplateProvider(provider= S01MapperSelectSample.SelectUs
    List<UserEntity> queryUserByTemplateCondition(String name);

    @Matcher /*自己定义个Matcher注解也很容易*/
    List<UserEntity> query(Condition condition,String name);
}
你看到的这些用在Mapper上注解都是可以自定义,自己扩展的
例子8 使用Fetch 注解
可以在查询后根据Fetch注解再次获取相关对象,实际上@FetchOne和 @FetchMany是自定义的,用户可自行扩展
    @Data
    @Table(name="user")
    @Fetch
    public static class UserData {
        @Auto
        private Integer id;
        private String name;
        private Integer departmentId;
        @FetchOne("departmentId")
        private DepartmentData dept;
    }

    /**
     * 部门数据使用"b" sqlmanager
     */
    @Data
    @Table(name="department")
    @Fetch
    public static class DepartmentData {
        @Auto
        private Integer id;
        private String name;
        @FetchMany("departmentId")
        private List<UserData> users;
    }
例子9 不同数据库切换
可以自行扩展ConditionalSQLManager的decide方法,来决定使用哪个SQLManager
        SQLManager a = SampleHelper.init();
        SQLManager b = SampleHelper.init();
        Map<String, SQLManager> map = new HashMap<>();
        map.put("a", a);
        map.put("b", b);
        SQLManager sqlManager = new ConditionalSQLManager(a, map);

        //不同对象,用不同sqlManager操作,存入不同的数据库
        UserData user = new UserData();
        user.setName("hello");
        user.setDepartmentId(2);
        sqlManager.insert(user);

        DepartmentData dept = new DepartmentData();
        dept.setName("dept");
        sqlManager.insert(dept);
使用注解 @TargetSQLManager来决定使用哪个SQLManger
    @Data
    @Table(name = "department")
    @TargetSQLManager("b")
    public static class DepartmentData {
        @Auto
        private Integer id;
        private String name;
    }
例子10 如果想给每个sql语句增加一个sqlId标识
这样好处是方便数据库DBA与 程序员 沟通
 public static class SqlIdAppendInterceptor implements  Interceptor{
        @Override
        public void before(InterceptorContext ctx) {
            ExecuteContext context = ctx.getExecuteContext();
            String jdbcSql = context.sqlResult.jdbcSql;
            String info  = context.sqlId.toString();
            //为发送到数据库的sql增加一个注释说明,方便数据库dba能与开发人员沟通
            jdbcSql = "/*"+info+"*/\n"+jdbcSql;
            context.sqlResult.jdbcSql = jdbcSql;
        }
 }
例子11 代码生成框架
可以使用内置的代码生成框架生成代码何文档,也可以自定义的,用户可自行扩展SourceBuilder类
	List<SourceBuilder> sourceBuilder = new ArrayList<>();
	SourceBuilder entityBuilder = new EntitySourceBuilder();
	SourceBuilder mapperBuilder = new MapperSourceBuilder();
	SourceBuilder mdBuilder = new MDSourceBuilder();
	//数据库markdown文档
	SourceBuilder docBuilder = new MDDocBuilder();

	sourceBuilder.add(entityBuilder);
	sourceBuilder.add(mapperBuilder);
	sourceBuilder.add(mdBuilder);
	sourceBuilder.add(docBuilder);
    SourceConfig config = new SourceConfig(sqlManager,sourceBuilder);
   //只输出到控制台
	ConsoleOnlyProject project = new ConsoleOnlyProject();
	String tableName = "USER";
	config.gen(tableName,project);
例子13 定义一个Beetl函数
        GroupTemplate groupTemplate = groupTemplate();
        groupTemplate.registerFunction("nextDay",new NextDayFunction());

        Map map = new HashMap();
        map.put("date",new Date());
        String sql = "select * from user where create_time is not null and create_time<#{nextDay(date)}";
        List<UserEntity> count = sqlManager.execute(sql,UserEntity.class,map);
nextDay函数是一个Beetl函数,非常容易定义,非常容易在sql模板语句里使用
   public static class NextDayFunction implements Function {

        @Override
        public Object call(Object[] paras, Context ctx) {
            Date date = (Date) paras[0];
            Calendar c = Calendar.getInstance();
            c.setTime(date);
            c.add(Calendar.DAY_OF_YEAR, 1); // 今天+1天
            return c.getTime();
        }
    }
例子14 更多可扩展的例子
根据ID或者上下文自动分表,toTable是定义的一个Beetl函数,
    static final String USER_TABLE="${toTable('user',id)}";
    @Data
    @Table(name = USER_TABLE)
    public static class MyUser {
        @AssignID
        private Integer id;
        private String name;
    }
定义一个Jackson注解,@Builder是注解的注解,表示用Builder指示的类来解释执行,可以看到BeetlSQL的注解可扩展性就是来源于@Build注解
@Retention(RetentionPolicy.RUNTIME)
@Target(value = {ElementType.METHOD, ElementType.FIELD})
@Builder(JacksonConvert.class)
public @interface Jackson {

}
定义一个@Tenant 放在POJO上,BeetlSQL执行时候会给SQL添加额外参数,这里同样使用了@Build注解
/**
 * 组合注解,给相关操作添加额外的租户信息,从而实现根据租户分表或者分库
 */
@Retention(RetentionPolicy.RUNTIM@
@Target(value = {ElementType.TYPE})
@Builder(TenantContext.class)
public @interface Tenant {

}
使用XML而不是JSON作为映射
@Retention(RetentionPolicy.RUNTIME)
@Target(value = {ElementType.TYPE})
@Builder(ProviderConfig.class)
public @interface XmlMapping {
    String path() default "";
}
参考源码例子 PluginAnnotationSample了解如何定义自定的注解,实际上BeetlSQL有一半的注解都是通过核心注解扩展出来的
例子15 微服务事务
BeetlSQL除了集成传统的事务管理器外,也提供Saga事务支持,支持多库事务和微服务事务。 其原理是自动为每个操作提供反向操作,如insert的反向操作是deleteById,并把这些操作作为任务交给Saga—Server调度。实现了通过Kafka作为客户端(各个APP)与SagaServer 交互的媒介保证任务可靠传递并最终被系统执行。
String orderAddUrl = "http://127.0.0.1:8081/order/item/{orderId}/{userId}/{fee}";
String userBalanceUpdateUrl = "http://127.0.0.1:8082/user/fee/{orderId}/{userId}/{fee}";
..........
SagaContext sagaContext = SagaContext.sagaContextFactory.current();
try {
  sagaContext.start(gid);
  //模拟调用俩个微服务,订单和用户
  rest.postForEntity(orderAddUrl, null,String.class, paras);
  rest.postForEntity(userBalanceUpdateUrl, null,String.class, paras);
  if (1 == 1) {
    throw new RuntimeException("模拟失败,查询saga-server 看效果");
  }
} catch (Exception e) {
  log.info("error " + e.getMessage());
  log.info("start rollback  " + e.getMessage());
  sagaContext.rollback();
  return e.getMessage();
}
以用户系统为例(源码是DemoController),userBalanceUpdateUrl对应如下扣费逻辑
@Autowired
UserMapper userMapper;
@Transactional(propagation= Propagation.NEVER)
public void update(String orderId,String userId,Integer fee){
  SagaContext sagaContext = SagaContext.sagaContextFactory.current();
  try{
    sagaContext.start(orderId);
    UserEntity  user  = userMapper.unique(userId);
    user.setBalance(user.getBalance()-fee);
    userMapper.updateById(user);
    sagaContext.commit();
  }catch (Exception e){
    sagaContext.rollback();
  }
}
这里的UserMapper实际上是SagaMapper子类(而不是BaseMapper),会为每个操作提供反向操作
public interface SagaMapper<T> {
	/** sega 改造的接口**/
	@AutoMapper(SagaInsertAMI.class)
	void insert(T entity);

	@AutoMapper(SagaUpdateByIdAMI.class)
	int updateById(T entity);

	@AutoMapper(SagaDeleteByIdAMI.class)
	int deleteById(Object key);
}
BeetlSQL的架构
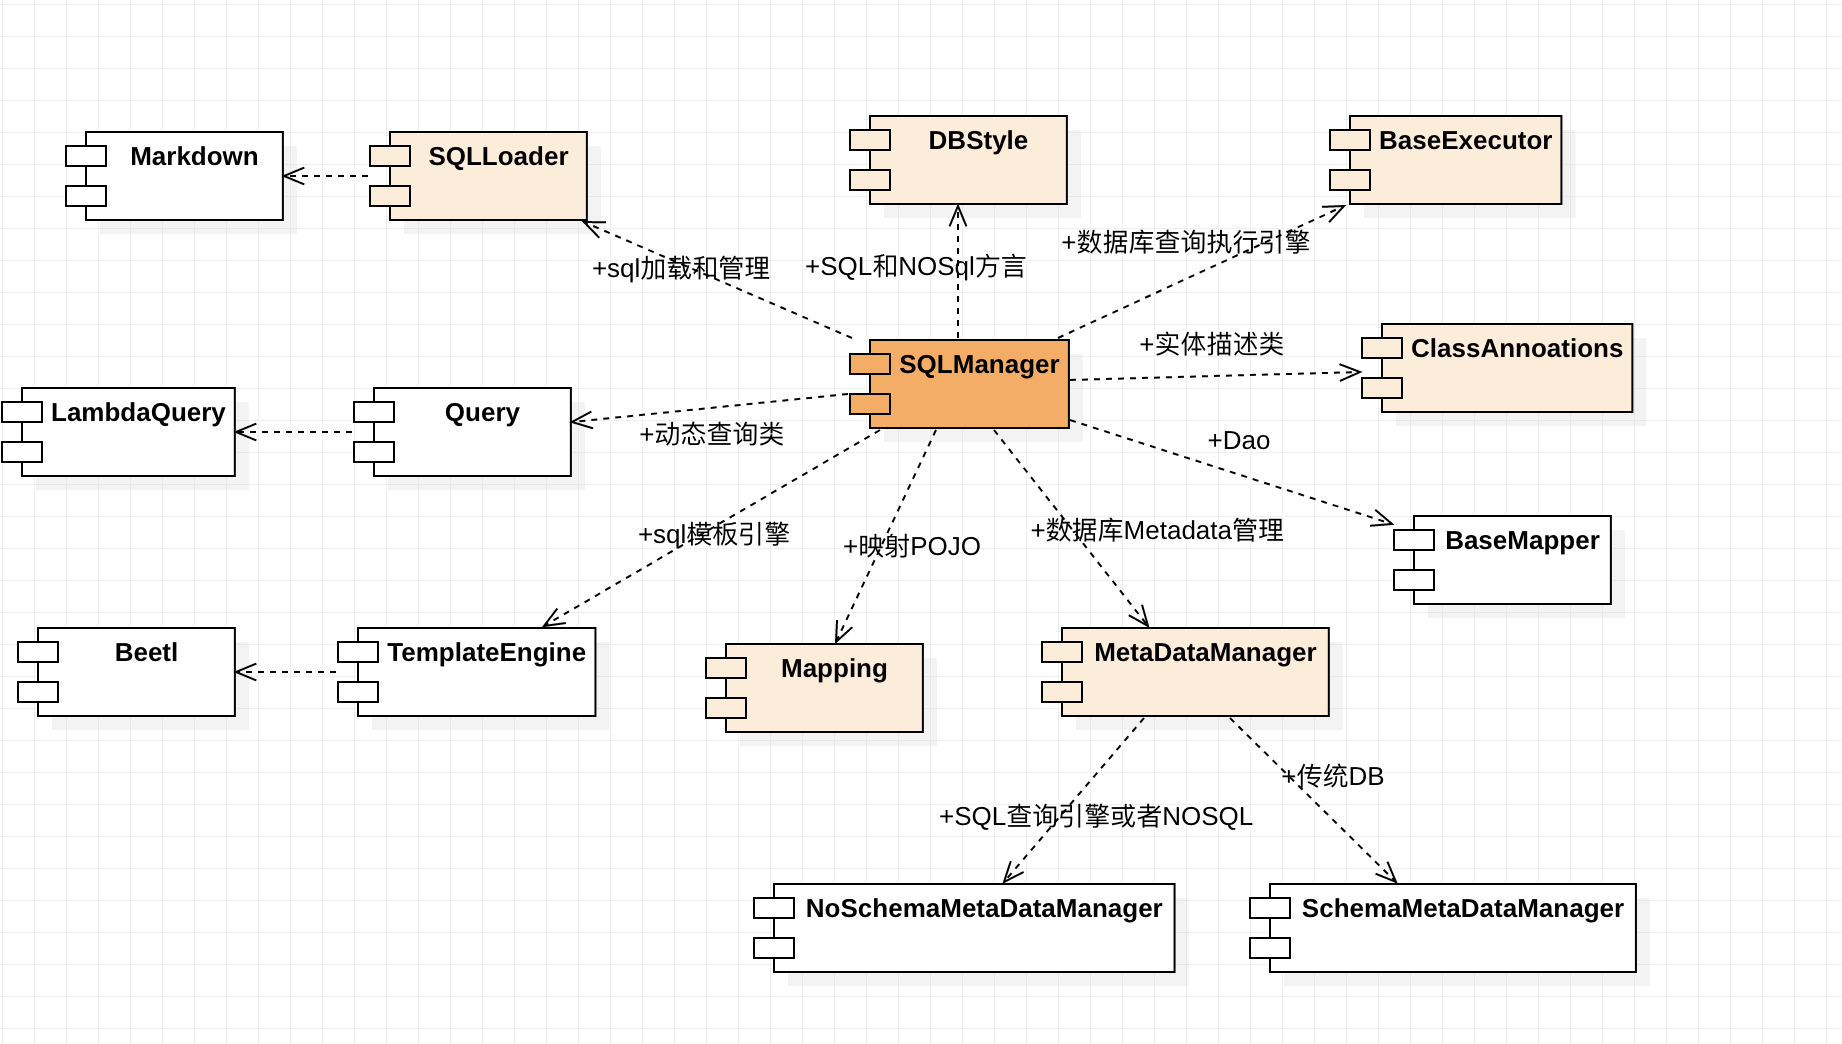
除了SQLManager和ClassAnnotations,任何一部分都可以扩展
以上就是本文的全部内容,希望对大家的学习有所帮助,也希望大家多多支持 码农网
猜你喜欢:
- NPM包(模块)发布、更新、撤销发布
- 有赞灰度发布与蓝绿发布实践
- 【重磅发布】Linkis 0.10.0 版本发布
- BeetlSQL 3.0.9 发布,Idea 插件发布
- 贝密游戏 0.7.0 发布,发布斗地主
- 【重磅发布】DataSphere Studio 0.9.0 版本发布
本站部分资源来源于网络,本站转载出于传递更多信息之目的,版权归原作者或者来源机构所有,如转载稿涉及版权问题,请联系我们。

机器与人:埃森哲论新人工智能
【美】保罗•多尔蒂 詹姆斯•威尔逊 / 赵亚男 / 中信出版社 / 2018-10-1 / 49.00元
自人工智能问世以来,人们普遍持有人机对立的观点,且无时无刻不在害怕自己的工作会被人工智能取代。作者认为,是时候抛开这些无谓的担忧了,因为人类社会正走向一个与机器共融共生的时代。 未来的新型工作模式是什么?未来有哪些工作不会被人工智能取代?人工智能时代重要的生存技能是什么?本书围绕这三大核心问题做了透彻的分析。作者带我们见识了置于业务流程背景之下的人工智能,阐述了其在不同职能部门中起到的推动作......一起来看看 《机器与人:埃森哲论新人工智能》 这本书的介绍吧!


